I finally got around to playing with the Scriptable app, something that had been on my list since I heard about the app’s newest ability — letting you turn custom Javascript into iOS 14 widgets.
The obvious place for me to start was to try and replicate the departure boards you see at Stockholm’s bus stops, since I had (very recently) also tried to write a macOS screensaver that would do just that, before life got in the way. Continuing that abandoned project in what seemed — and, as my experiments showed, definitely is — a “friendlier” environment seemed like the logical thing to do.
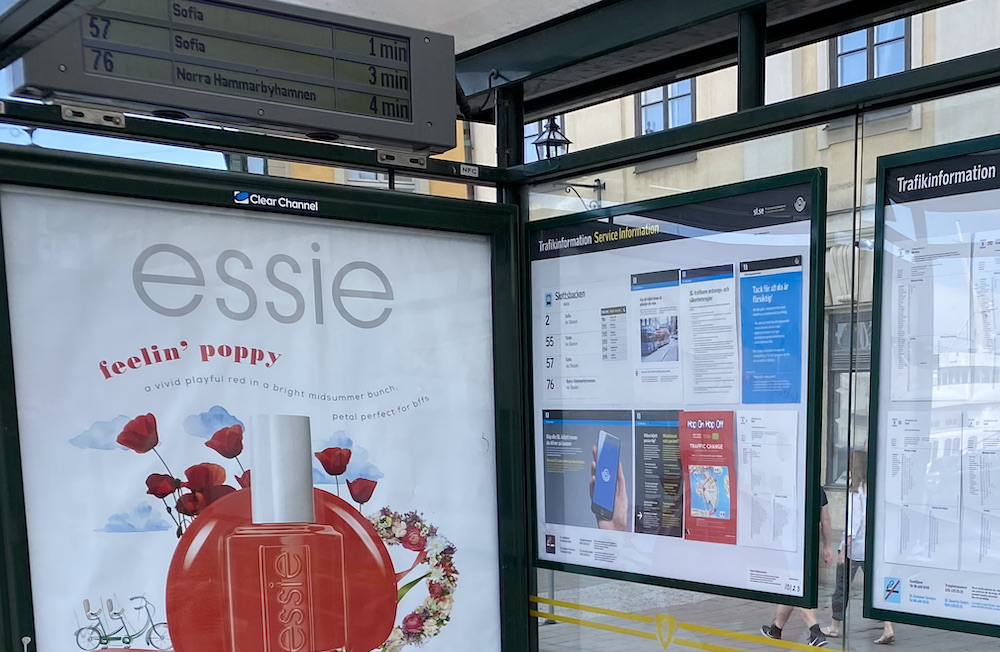
Getting started with Scriptable was pretty simple, thanks largely to the sample scripts within the app, specifically the View JSON and News in Widget scripts which do exactly what their names suggest. Taking the relevant bits from the two scripts and pointing them to SL’s awesome real-time API was as easy as I thought developing the screensaver would be.
I’ve released the script as a Gist (and embedded it below), and here are some thoughts on Scriptable and writing widgets on iOS 14, as well as the script itself:
- This is very much a quick-and-dirty script put together in a couple of hours, and is specific to my use case as someone who lives close to a bus stop (and no train line nearby) but hates waiting there. The idea is to monitor upcoming departures at a specific bus stop in one direction so I can time my own departure from the house to minimise waiting. It should be trivial to customise the script for a more generic requirement.
- I use a pure black background as my iPhone wallpaper, hence the motivation to use a pure black background colour for the widget. With that said, though the screenshot shows the widget being used on the home screen, I don’t foresee continuing to use it like this on a daily basis largely to the fact that there’s no way (that I’ve come across) to force the widget to update periodically (every minute would be ideal). Which is why I was forced to add the “Updated:” bit in the footer, so I know how dated the information that I’m looking at is, and to manually run the script again (which shows the updated widget as a popup), if necessary.
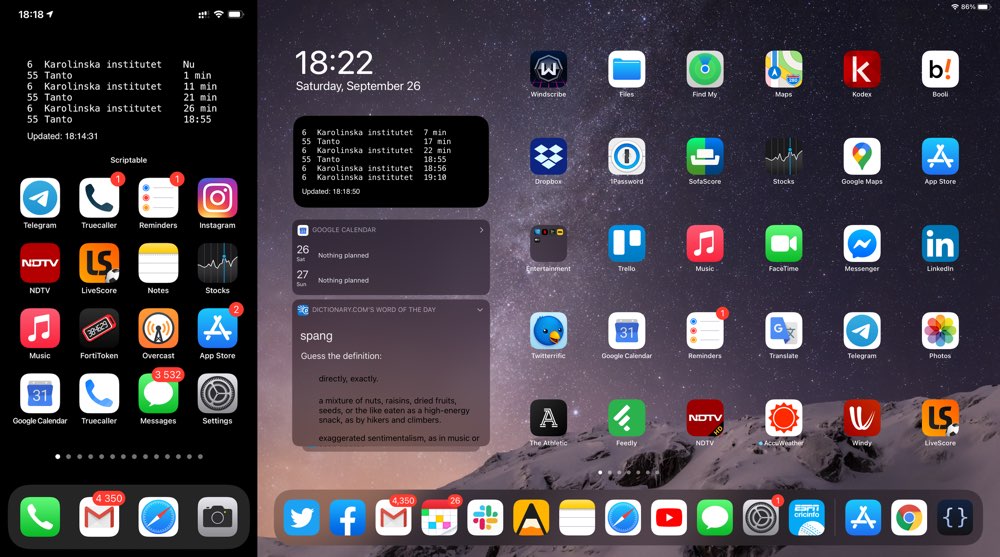
- Scriptable offers plenty of options that let you customise the look and feel of the widget but I didn’t bother experimenting with most of those. Ideally, I would love for the widget to look exactly like the boards you see at bus stops — the “stacks” added in the current TestFlight build should make it easier to do stuff like that — giving this very much “functional” widget some much-needed “whimsy”.
- As you can see I went the good-old fashioned “tabs and fixed-width fonts” route for formatting. For some reason using “regularMonospacedSystemFont” wouldn’t return a fixed-width font (as I understood it should), so I ended up hardcoding the font name itself, though Menlo wouldn’t have been my first pick otherwise. If you know why the regularMonospacedSystemFont approach didn’t work, please let me know via Twitter or the comments.
- I did all the development on the iPad (Scriptable of course is available for both iPhone and iPad) and while the development process itself was pretty straightforward, figuring out how to add a Scriptable widget to the ‘Today View’ when I was done took a lot more time than I’m willing to publicly admit. I kept looking for Scriptable under (what I now know is the old) list of widgets you see when you go to Edit > Customize from the bottom of the Today view. Maybe it’s just me, but that “+” sign to add iOS 14-only widgets is really easy to miss, especially when you are in landscape mode (which is how I use the iPad 99 percent of the time).
While it’s convenient to have this information on the iPhone and iPad, the need to build that screensaver still remains — the idea is to have the Macs in the house act as giant departure boards you can glance at while getting ready. I hope to return to development soon and add to my screensaver collection of one.